

Thomas Anderson
Of the many fascinating and beautiful underwater phenomena, fluorescence stands out as one of the most interesting—and fun!
Fluorescence occurs when organisms absorb light at one wavelength, then display it back as a different color, creating vivid, bold colors that aren’t normally visible to the naked eye. This makes ordinary critters look radically different and turns night diving into the perfect playground for capturing unique images.
Gear for Fluorescence Photography
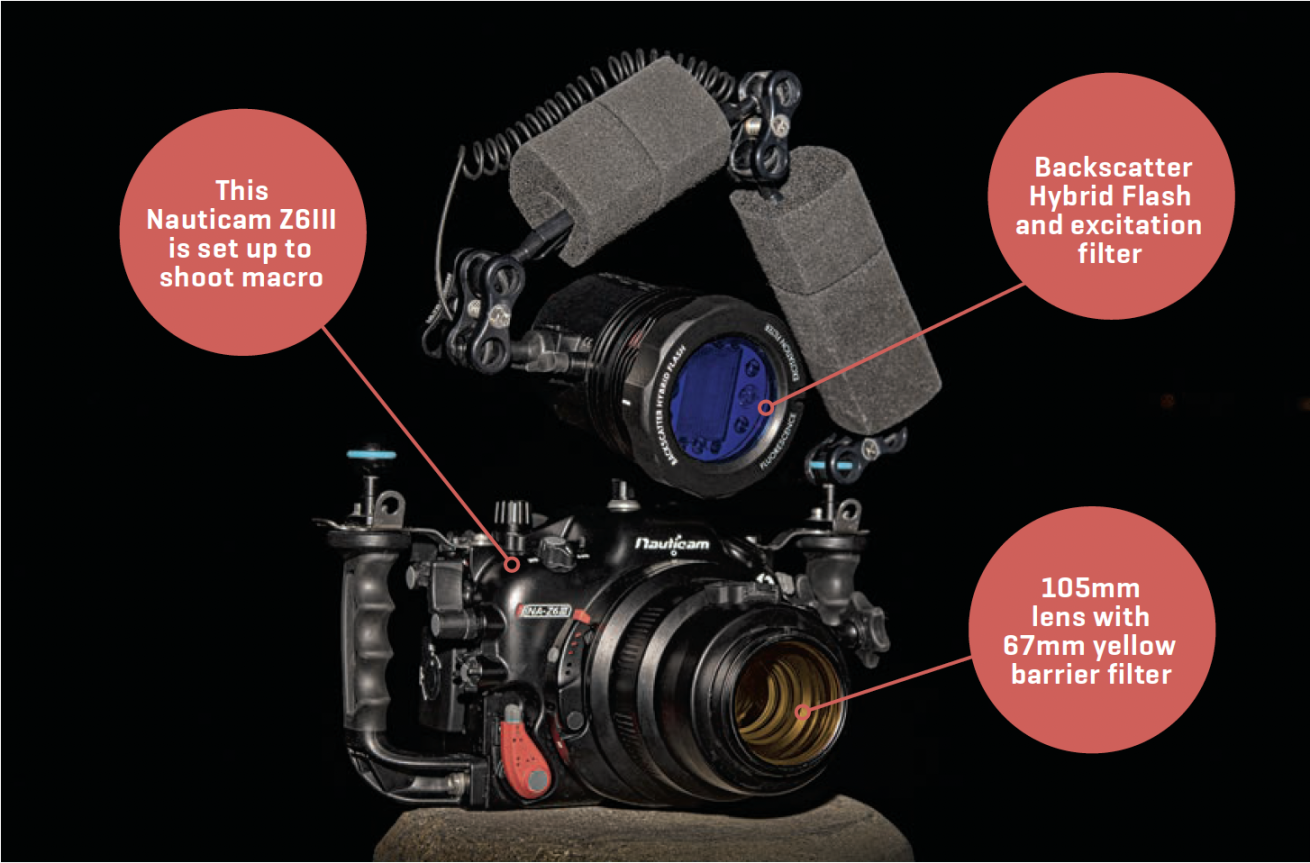
Shooting fluorescence (often referred to as fluoro) is a highly specialized style of underwater photography that requires specific gear. Basic equipment needed along with your camera is a close-focusing lens, such as a macro lens. Getting closer to your subject allows more light to reach it, creating a stronger fluorescence effect.
The first piece of dedicated fluoro gear needed is an excitation filter. This filter attaches to your flash and converts the light from standard white light to a special blue spectrum that is needed to “excite” and see fluorescence.
Excitation filters are either designed for specific strobe models or made as universal versions that fit multiple types of strobes. These filters do reduce the light output from your flash, so brighter flashes are better suited for fluoro photography. Though there are video light excitation filters and specialized blue/UV video lights, these just aren’t bright enough for photography and are best used for spotting subjects or video work.
Related Reading: How to Master the Motion Blur Photo
The blue light from your flash will excite and show fluorescence, but it also casts an unnatural-looking blue hue across the whole scene. However, if you check the example image, there’s no blue light to be seen. This is because a yellow barrier filter was used. Yellow is the opposite of blue on the color wheel and acts as a “barrier” to blue light, effectively canceling it out, which is why fluoro photos don’t appear blue.
Another good tool to have is a spotlight—either a dedicated blue light, a light with excitation filter or, if it has built-in LEDs, your filter-equipped flash. This will be used to locate subjects that fluoresce.
Lastly, a yellow barrier dive mask will make finding subjects easier. The mask filter fits over the front of your dive mask and cancels out the blue light, just like your camera’s barrier filter. This makes locating any fluorescing subject easier, since you’ll only see fluorescent glow, without any obscuring blue light.
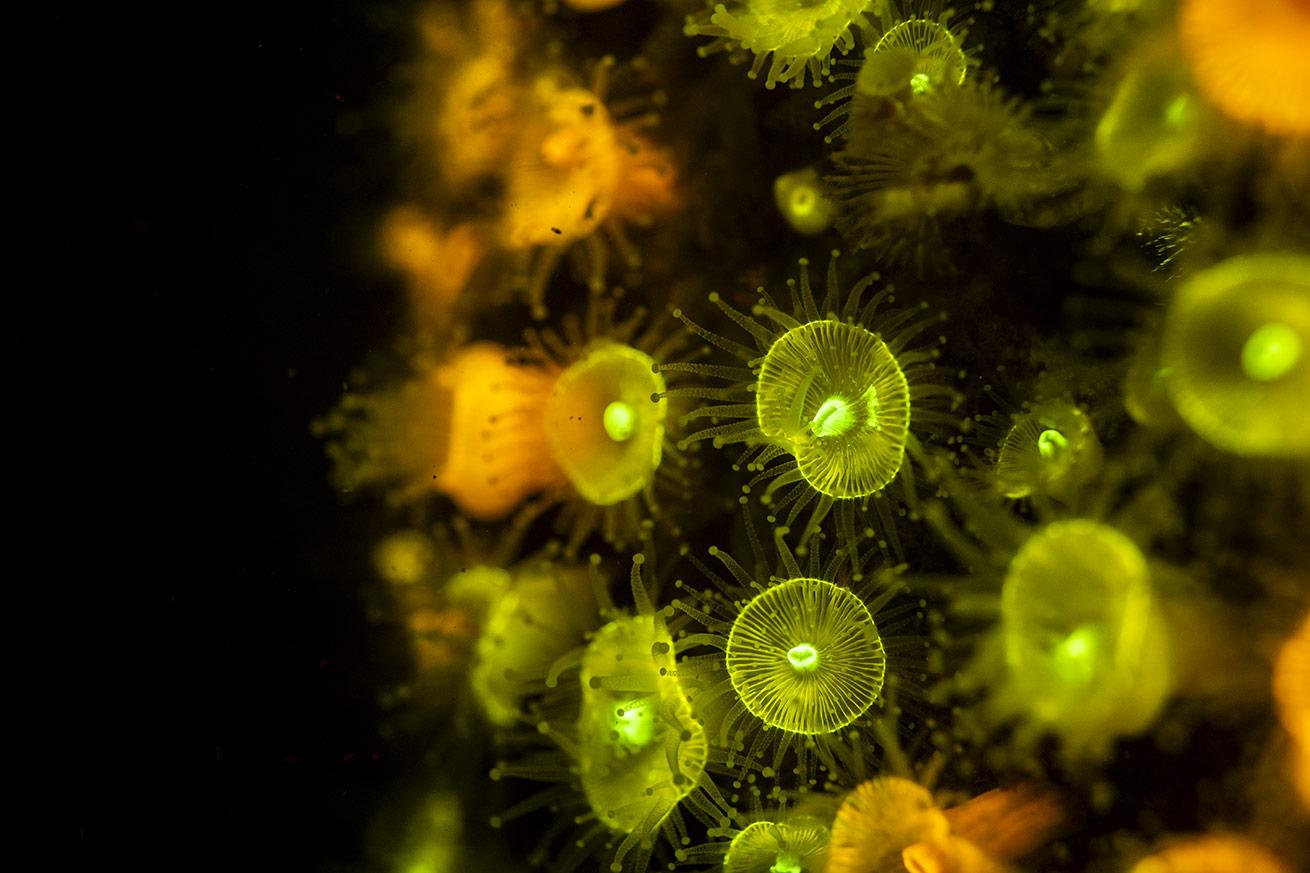
Thomas AndersonAnemones tend to have a bold fluoro glow. Individuals within the same species can even have different colors with different patterns. Shot with a Nikon Z6III, 60mm f/2.8G lens and Backscatter Hybrid Flash and excitation filter.
Settings for Fluorescence Photography
There is no one perfect setting that fits all fluoro shooting situations. The strength of fluorescence among critters is highly variable and can even be different among individuals of the same species. Overall, you will want to use settings that let in more light to bring out a stronger fluorescence effect.
First off, shutter speed doesn’t matter much. Make sure it’s within your camera’s flash sync speed and freezes motion (i.e., 1/125). Use an aperture range of f/8 to f/11. This both creates a strong depth of field, keeping things sharp, and lets in more light than traditional, stopped-down close-up apertures like f/22.
ISO is typically between 400 and 3200, depending on the subject. Subjects with a strong fluoro effect, like most corals and anemones, will be lower down on that range, while most fish and mobile invertebrates will be on the higher ISO range.
Using manual flash power is preferred, and you’ll likely be using max power to get plenty of light on the subject.
Related Reading: How to Photograph Tide Pool Split-Shots
Technique for Fluorescence Photography
Shooting fluorescence is always a night-diving activity. This is because the effect is hard to see compared to ambient daylight.
The biggest challenge is locating exceptional subjects. Fortunately, critter hunting for fluoro photography is super fun! This is where the yellow barrier dive mask and your blue light come in handy. Take your time hunting; some of the coolest subjects may have a more subtle glow compared to easy-to-find, super bright corals and anemones.
Once you have located your subject and find focus, get your strobes as close in as possible. With your strobes positioned close, take a shot and review your image. What you’re looking for is a dark background with only the fluoro glow visible. If there is any surrounding glow bleeding into the image, stop down your aperture or lower your ISO.
Overall, think differently when shooting fluoro. This is a great opportunity for shooting abstracts to keep your audience engaged and wanting more. Fluoro also creates opportunities for unique, striking backgrounds.
All in all, shooting fluoro is an awesome opportunity to get creative and shoot outside the box of “normal” photography. It’s also a great chance to capture interesting images and have a ton of fun in the process!


